
When purchasing a new hosting service, the last thing you want to do is migrate your website to a new host. After all, it takes so much time and effort to choose the new hosting plan, it’s perfectly normal not to want to go through this process again. However, at some point in our digital life, changing hosting may be necessary.
Whatever the reason for changing your hosting provider, this process can become complicated, depending on your website’s platform and how your emails are stored.
Table of Contents
Basic Concepts of How a Website Works
Before entering the migration process itself, it is important to understand some concepts, such as the basic functioning of a website. To publish a website, you need the files that make up the website to be on a hosting server. And also that the domain you registered for your site is directed to the server in question. Thus, when people access your website address, internet service providers will know which server it is located on and will be able to direct the user’s request there.
This process of recognizing the domain and location of the hosting server is done on DNS servers (Domain Name System, or domain name system), which are computers generally dedicated to this function. Making a comparison, it is as if the DNS servers were a gigantic information service, where requests for server locations arrive and are answered in milliseconds. So, when you type in a website address and hit Enter, your order goes to a DNS server and asks, “ Where can I find the xyz.com email address?. The DNS server, in turn, replies: “the address xyz.com is located on the server 123.456.789.01”.
Now that we know the basic functioning of a DNS server, we can deduce that it is enough to point the domain of my website to the new server and all access will be directed to the new hosting, right? Exactly! This is how it works: when changing a hosting site, we need to update the DNS information for that domain so that everyone looking for that site is directed to the new server. But for everything to work correctly after the DNS change, it is essential that the files and settings of the old server are migrated to the new server.
Ok, enough with concepts let’s get down to business! What to do before migrating the hosting.
What To Do Before Migrating Hosting?
Top of your list should be choosing a new hosting provider. If you want to keep your website as it was on the old hosting, it is important to check if the new hosting is compatible with the technology used on your current website. For example: if my site needs version X of PHP to work, the new hosting must run that same version of PHP or higher.
Now that you’ve done your research, and chosen your new hosting provider, we can move on to the first step of the process, which is the preparation itself.
Preparing to Migrate Hosting
Before you begin, take an inventory of everything that will need to be migrated. This way, you can check, during the process that you’ve left nothing out. In many cases, the migration process will include the following:
- Hosting server files
- Databases (if any)
- Email and messaging accounts (if any)
- Hosting settings
- Domain pointing (DNS) to the new server (this should be last on your list to prevent any downtime on your website)
Step by Step to Migrate Hosting on your own
- 1 – Moving files
The first step in migrating hosting is to copy all files from your old server to the new one. This includes image files, audio, videos, and all the source code of your websites, such as HTML files, Javascripts, and CSS’s. They must be moved to the new host keeping the same directory structure that’s in the public folder.
Every hosting account has a public folder, which is where your files are accessed by the public. The name of this folder can be something like public_html or httpdocs. Therefore, when moving files from one host to another, keep the same file structure for the public folder.
Find out where the public folder is and move files. If you were unable to locate this folder, contact your hosting support and they will be able to help you.

File migration can be done in several ways. One is using an FTP program, which is a protocol created exclusively for transferring files. There are several free FTP programs out there. If you don’t use any of them, we recommend Filezilla, which is easy to use and updated regular by its developers.
To migrate files using an FTP program, you must first connect to the current hosting and download all files from the public folder to your computer. After downloading all files, connect to the new hosting provider and transfer the files you just downloaded to the public folder on your new host. This process can take a little time, depending on the number of files and your internet connection.
If you have a static website, that is, one that does not have dynamic content, it will probably be working after migrating all files. But you will not be able to access it through the domain, because it is still pointing to the old hosting server.
If you use a dynamic website that has a content manager, such as WordPress or Joomla, your website will not work yet, because it is also necessary to migrate the database.
- 2 – Moving Databases
This is a very important part of the process for migrating hosting. If you use a CMS or content manager, such as WordPress or Drupal, you will also need to move your application’s database. The basic concept of this procedure is similar to that of moving files: you need to export the databases from your old hosting and import it into the new hosting. As with file migration, there are several ways to move a database. We will try to simplify this operation as much as possible in this article.
All databases have an export and import method. In the MySQL database, for example, it is possible to export a text file that has the extension .sql. This file contains all tables, settings, and database information for the application in question. The MySQL database is the one used by WordPress and Magento, for example.
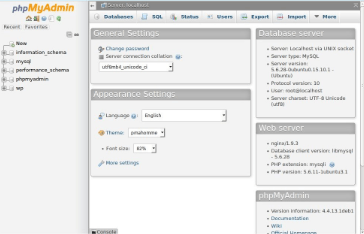
One of the ways to export your application’s .sql file is through your hosting control panel. Many hosting companies offer database management through a program called PHPMyAdmin, which is a database manager that can be accessed through any internet browser. If your hosting offers PHPMyAdmin, then all you need to do is access it, select the database you want to export, and choose “Export” from the top menu.
Important tip: if you create a database with the same name, username, and password that you used in the old hosting, it is possible that you do not need to make any adjustments to the connection of your application. In terms of explaining it better: every application has a file with the connection information to the database, which is usually (localhost) hostname, username, and password. If, when changing hosting, any changes, you will need to edit the database connection file to reflect this new configuration. The adjustment is generally easy to do, but carelessness with that part and you can take your site offline until this is corrected. Therefore, it is worth a lot of attention on this issue.
How to check if the connection to the new database is correct (or: browsing the site before DNS propagation)
Considering that your domain is still aimed at the old host, you will not be able to simply type the URL in your browser and access your website, this is because the DNS service will direct your request to the old hosting.
To work around this issue, you can make a small configuration on your computer to force it to access the new server – not the old one – by entering your website address in the browser. This feature is very useful in this phase of testing the new server.
To do this, you will need to edit the “hosts” file on your computer (the file name is the same: hosts). Depending on the operating system (Windows, Mac, or Linux) this file will be located in a different place. You will find the hosts file in the following places, depending on your operating system:
- Windows: C:\Windows\System32\drivers\etc\hosts
- Mac OS: /private/etc/hosts
- Linux: /etc/hosts
Locate this file on your computer and open it with a notepad or any other simple text editor. Important: Do not use Word or similar text editing programs.
The rule is as follows: First, you write the hosting server’s IP address followed by a space or tab and the URL of the website you want to visit. Usually, the hosting company sends the server’s IP when the plan is activated. If you cannot find this information, the company’s technical support can provide you with this.
Note: on Windows operating systems, you will need to open the file as an administrator, to have the necessary permission to edit it. To do this, simply locate the notepad in the list of programs (or any other plain text editor), right-click and choose “Run as administrator”. Once the program has been opened, simply select from the “open” or “open” menu and locate the host file.
Important: after making sure that everything is working correctly on the new server, delete the changes you made to your hosts’ file so that your computer will re-request the server on which your website is hosted.
- 3 – Email Migration
Dealing with the issue of emails can be one of the most annoying parts when it comes to migrating. Email migration isn’t necessarily the most complicated part of the journey. Let’s look at some of the possibilities for migrating e-mails below.
Before proceeding, it is important that you verify that your emails are being stored on your hosting server or on a third-party service, such as G Suite or Microsoft Office 365.
If you use an external email service
If you are using a third-party service (eg, G Suite or Microsoft 365), you will not need to migrate the emails, because they are not stored on your hosting server. In that case, you will only need to perform a small configuration on your new host so that the new server knows where it should direct the emails that arrive at your domain.
In the case of G Suite, for example, you will only need to insert MX-type records on your hosting server. The values to be used for G Suite.
If you have difficulties on configurations, please contact the technical support of your new host. They will be able to help you with this configuration.
If you host emails on your hosting server
In this case, the first thing to do is to access your new hosting’s control panel and recreate all existing email accounts on your current hosting. This procedure will ensure that you will continue to receive emails after changing your domain’s DNS to the new hosting. This will not, however, copy the messages to the new hosting.
If you use a program installed on your computer to access your email accounts, such as Outlook or Thunderbird, you already have a backup of your messages. In that case, you only need to review the send and receive settings to continue receiving your emails in your email program after the DNS change.
If you only use webmail to access your messages, it means that your account emails are hosted at your old hosting and you will need to migrate all messages to the new server. This way, you can continue to access them, even after the DNS change. We will see below some alternatives for this message migration.
Migrating emails from cPanel to cPanel
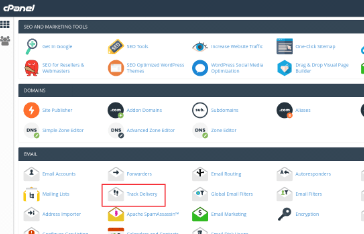
If both your old and new hosting use cPanel as the hosting control panel, you can migrate both email accounts and messages from one cPanel to the other, using an FTP program.
- STEP 1
Connect to your old hosting via FTP and navigate to your user folder. Then find and access the folder/etc. When accessing it, you will see that there are one or more folders with your domain name (eg mydomain.com). This folder contains all email accounts for the domain in question. Download this folder to your computer and save it where you can find them later.
- STEP 2
Now go back to the user folder and locate and access the/mail directory. This folder contains all the messages that are stored on the server of your old hosting. Repeat the save process and download the folders inside/mail to your computer.
- STEP 3
Now that you have backed up your email and messaging accounts to your computer, the final step is to access your new hosting via FTP and upload the content you downloaded to the corresponding folders (/etc/mail).
After uploading, to confirm that the operation was successful, access the webmail of your new hosting and see if the accounts and e-mails will be there. As you have not yet pointed the DNS for the new hosting, you will be able to access the webmail on your new hosting from within cPanel, in the e-mails section, or through an alternative address, provided by your new hosting.
Migrating Emails Using an Email Program
Another option to move your emails from one server to another is to use an email program installed on your computers, such as Outlook or Thunderbird.
- STEP 1
The first step is to install the email program. We recommend Thunderbird, which is free and does the job perfectly.
- STEP 2
In your new hosting, recreate the email account to which you want to migrate your messages.
- STEP 3
In Thunderbird, enter your old email account using the IMAP protocol. Then, enter your new email account (which will have the same address), but connect to it with the server address, instead of the address you would traditionally use. If you have any questions, ask your hosting company support on how to access the e-mails before the DNS propagation.
- STEP 4
In Thunderbird, find the inbox with your old messages and select the messages you want to send to the new server. Right-click and choose “Copy to”. In the menu that opens, click on the new email account you created on the new hosting. The program will then start copying messages from one account to the other. You will be able to follow the progress through the status of the transfer, which will appear in the footer.
When transferring from one account to another, Thunderbird will synchronize the messages being copied to your new hosting. The annoying part is that this process can take a long time, depending on the number of messages you have in your mailbox.
If you have made it this far and have completed all of the steps above, you have already managed to transfer your files, databases, and email accounts from one host to the other. The next step is to review the last details and finalize the process of migration. Nearly there!
- 4 – Hosting settings
This step could be done at the beginning, before actually starting to migrate from hosting and transferring any file from the old server to the new one. You will need to recreate some of the existing settings on the old hosting for the new server. These settings may include:
- Additional domains;
- Parked domains;
- Subdomains;
- Redirects;
- Email forwarding;
- Customized configurations (eg PHP version);
- And others.
You will need to check your current hosting if any customization has been carried out so that it can be reproduced in the new environment.
In some cases, such as when using a CMS like WordPress, it will make a big difference. Some WordPress plugins, for example, will only work with a certain version of PHP. Most hosts offer ways to change the version of PHP and many other settings of this type.
If you are not sure if there are any such configurations, go ahead and do the final check of the new hosting. If there are any configuration problems, you will probably find out in this step.
- 5 – Last step: final verification and DNS change
Before “turning the key” and pointing the domain of your website to the new hosting, it is important to review item by item and check that everything is working correctly. Thus, will avoid unpleasant surprises, such as having the site down without any apparent explanation.
Check if the files were migrated if the database (s) were imported correctly if the emails were migrated and most importantly browse your website on the new hosting. To do this, follow the procedure above that we describe in the section on how to check if the connection to the new database is correct. This procedure also applies to static sites, which do not have a database.
If you got here and managed to solve all the possible problems that arose, then it is time to point the domain to the new hosting. To do this, you must access the panel of the company where you registered your domain and change the DNS to point to the new server. To find out which DNS values to use, consult the email you received from your new hosting, confirming account activation.
After the DNS change, your site may experience a few hours of instability. This is due to the DNS propagation time which can take up to 48 hrs. After that, if you still encounter problems, contact your new hosting support and explain what is going on.
When to Cancel Your Old Hosting
Do not cancel your old hosting until you are sure that everything is working correctly, even after the DNS change. Problems that went unnoticed may appear after the DNS change, so it is prudent to wait at least a week or two after the DNS change before canceling your old hosting.
If after that time you are sure that everything is ok, go ahead and cancel your old host.
Alternative Method: Use the Migration Service of Your New Hosting
If you found this hosting migration process very complicated, be aware that many companies offer free hosting migration services. Using this type of service, in addition to being very convenient, can save you a lot of headaches with strange settings along the way.
If you have not yet paid for your new hosting, contact the company you intend to purchase from and see if they offer the service of migrating websites. Many offer the service free of charge, but some charge for the task. Therefore, it is worth checking before purchasing.
Conclusion
The process to migrate from one host to another can be very labour intensive. Of course, unexpected situations may arise, due to the complexity that involves the functioning of websites and systems hosted on the internet.
When faced with the unexpected, do not despair. Remember that the support from the hosting company you have purchased should be accessible to help you with questions related to the configuration of your new hosting. If they can’t solve the problem, at least they can give you some guidance on the subject.